Now facebook made it easy to get in touch with your blog readers through its chat widget in active conversation. Being in touch with your blog readers is a surefire way to collect the information from the visitors. The information includes the questions, queries, suggestions, and feedbacks. If you visit pro bloggers, they strategically offer many options to stay tuned with their readers. So, why you are chewing food improperly?
You may have seen the third party chat widgets and plugins on various sites, but you could hardly find threaded comment enabled chat widget. Facebook chat plugin has many powerful features like conversation notifications. In this way, you don't need to add the contact and feedback form separately. Facebook chat plugin will do this job for your blogger blogs. Just log into your Facebook account, and there will be notifications of conversations that people have had with you.
Real Also: How to Add Preloader to BlogSpot Blogs
Demo
Click here
How Does Facebook Chat Plugin Work on BlogSpot?
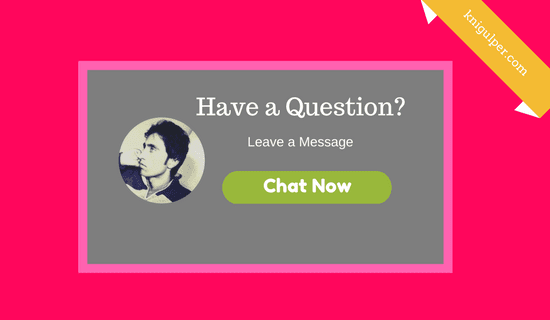
As soon as your readers land on your blogger, they will see a floating Facebook chat widget with your profile picture and Chat Now button. So, when they hit Chat Now button, a box will appear with threaded comments. They have the option to send their comments from their personal Facebook account or from the pages which they manage.
Check out: How to Add Tabs and Accordion to BlogSpot
Adding Facebook Chat Widget to Blogger Blogs
Before making any changes in your blogger theme you must backup it. Because in the event of any errors it will help you to restore your blog to its previous layout.
- Go to your BlogSpot Dashboard > Theme > Edit HTML
- Click inside the code area and press Ctrl + F from your keyboard
- As soon as you press the Ctrl + F, a search box will appear
- Type <body> and paste the Facebook comment plugin right below it
- Now find the ]]></b:skin> and add the given CSS right before it
- Final step, locate the </body> and add the HTML markup just before it
- Replace blue text with you image URL, black text with your blog URL/page id and click Save Theme
If you don't have plugin code, get it here
/*= facebook chat plugin by www.knigulper.com =*/ .choosetype {position:fixed; height:0px; bottom:0px; right:0px; width:455px; border:6px solid #0583f2; border-radius:3px;} .choosetype.show {height:420px; display:block !important; background:#fff; padding:15px; z-index:99999999; overflow-y:auto; overflow-x:hidden;} .boxshow {width: 260px;height:100px;overflow: hidden;position: fixed;right: 0px;bottom: 0px;z-index: 9999999;padding:15px; background:#0583f2; color:#fff; border-radius:3px;} .boxshow .needtitle {font-size:18px; font-weight:700; margin-bottom:3px; display:inline-block} .boxshow a, .boxshow p {color:#fff;} .boxshow p {margin-top:1px;margin-bottom:8px!important;} .boxshow img {float:left; margin-right:5 20px; border-radius:100%; position: absolute;left: 25px;top: 25px; border:none} .boxshow .moreinfo {float: left;width: 200px;float: right; text-align:center} #clickme {background:#5EB800; padding:6px; border-radius:3px; cursor:pointer;margin-top:4px;} .boxbix #clickmety {top:235px; position:fixed; right:440px; background:#0583f2; color:#fff; width:30px; height:30px; line-height:30px; text-align:center; z-index:-1; opacity:0; border-radius:3px;} .boxbix #clickmety i {color:#fff !important; font-family:fontAwesome !important} .hh {margin-top:18px;} #clickme {font-family: 'Montserrat', sans-serif;}
<div class='mydiv'> <div class='boxshow'> <img caption='Knigulper' src='https://4.bp.blogspot.com/-fsESWaZBdOU/WU0FLz5jApI/AAAAAAAACf0/wX_hQCqnMmw_XLu-pDlfuzXqckllMiwXQCLcBGAs/s1600/Farooq-ahmad-bhat.jpg' width='60' height:'60'/> <div class='moreinfo'> <a class='needtitle' href='#'>Have a Question?</a><p>Leave A Message</p> <p class='hh'><a id='clickme'>Chat Now</a> </p> <p class='get-this' style='margin-bottom:1px; margin-left:140px; padding-bottom: 0px;font-size:9px'> <a href='/' id='get'>Get plugin</a></p> </div> </div> <div class='boxbix'> <a id='clickmety'><i class='fa fa-close'/></a> <div class='choosetype' style='display:none'> <div class='fb-comments' data-href='http://www.knigulper.com' data-numposts='5' data-width='380'/> </div> <div class='clear'/> </div> </div> <script> //<![CDATA[ $("#clickme").click(function(){ $(".choosetype").toggleClass("show"); $("#clickmety").css({'z-index':'999999999999','opacity':'1','display':'block'}); }); $("#clickmety").click(function(){ $(".choosetype").toggleClass("show"); $("#clickmety").css({'display':'none'}); }); //]]> </script> <script> //<![CDATA[ (function(d, s, id) { var js, fjs = d.getElementsByTagName(s)[0]; if (d.getElementById(id)) return; js = d.createElement(s); js.id = id; js.src = "http://connect.facebook.net/en_US/sdk.js#xfbml=1&version=v2.5&appId=107780726282725"; fjs.parentNode.insertBefore(js, fjs); }(document, 'script', 'facebook-jssdk')); //]]> </script>
Now your Facebook chat widget is ready to work on your blogger.


hi... I've tried it. but this is the report I got
ReplyDelete" The reference to entity "version" must end with the ';' delimiter."
How do I fix it?
Hello Godson! Paste your facebook chat code here and press Convert. Copy the converted code and paste it in your theme.
DeleteVery nice brother you are great brother are you understand hindi language
ReplyDelete@Sultan Thanks!
Delete