
The error page is the essential part for a blogger, it basically redirects a user to a custom design of 404. Error 404 means the webpage, image, video, mp3 or any other resources are no longer exist on the link you clicked from the search results or on a Webpage. It happens when you delete a blog post, images, videos etc from your blogger but they still show up in google search results.
Check out: How to Create HTML Sitemap In Blogger Using Css3
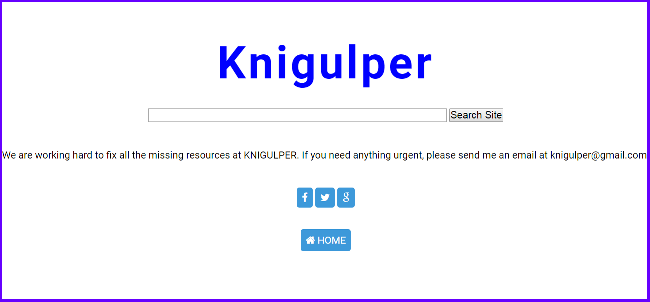
Blogger generates 404 Not Found when a user attempts to follow a broken or dead link, hence the 404 error is one of the most common errors found on the WWW (World Wide Web). Setting up a custom 404 page is a great way to make the blog visitor stay on your blogger. Therefore, it is a better SEO tool. Here, i will show you how to display a full width 404 error page with search box, social profiles and a custom 404 message.
How to Setup Custom 404 Error Page in Blogger
- Go to your blogger Dashboard > Template > Edit HTML
- Press Ctrl + F and search <head>
- Paste the following codes just below the <head>
- Now search the </style> or ]]></b:skin>
- Paste this code just above </style> or ]]></b:skin>
- Another and easy step, locate the <body> tag
- Paste the following code just below the <body> tag
- If you have done all the above steps, click Save Template.
<b:if cond='data:blog.pageType != "error_page"'> <title><data:blog.pageName/> - <data:blog.title/></title> </b:if> <b:if cond='data:blog.pageType == "error_page"'> <title>Page Not Found - <data:blog.title/></title> </b:if>
Note: If the code is already presented in your blogger template, skip this step.
<b:if cond='data:blog.pageType == "error_page"'> <style type='text/css'> #outer-wrapper {visibility:hidden;opacity:0;width:0;height:0;} #error404 {background:White;text-align:center;margin-bottom:50px;font-weight:400;font-size:20px;position:fixed;width:100%;height:100%;line-height:1.5em;z-index:9999;} #error-text {top:20%;position:relative;font-size:20px;color:#eee;} #error-text a{color: #FFF; background: #3D99DA; padding: 10px; border-radius: 5px;} #error-text a:hover{color:black;} #error-text p {color:#eee;margin:50px 0 0 0;} #error-text span {position:relative;color:#fff;font-size:450%;padding:0 20px;border-radius:5px;font-weight:700;letter-spacing:5px;transition:all .5s} #error-text span:hover {color:#fff;-webkit-animation:jelly .5s;-moz-animation:jelly .5s;-ms-animation:jelly .5s;-o-animation:jelly .5s;animation:jelly .5s;} @-webkit-keyframes jelly{ from,to{-webkit-transform:scale(1,1);transform:scale(1,1)}25%{-webkit-transform:scale(.9,1.1);transform:scale(.9,1.1)}50%{-webkit-transform:scale(1.1,.9);transform:scale(1.1,.9)}75%{-webkit-transform:scale(.95,1.05);transform:scale(.95,1.05)}} @keyframes jelly{ from,to{-webkit-transform:scale(1, 1);transform:scale(1,1)}25%{-webkit-transform:scale(.9,1.1);transform:scale(.9,1.1)}50%{-webkit-transform:scale(1.1,.9);transform:scale(1.1,.9)}75%{-webkit-transform:scale(.95, 1.05);transform:scale(.95, 1.05)}} @media only screen and (max-width:640px){ #error-text span {font-size:200%;} #error-text a:hover {color:#fff;}} .fa-google-plus {background: #dd4b39;} .fa-youtube {background: #f26522;} .fa-twitter {background: #00aced;} .fa-facebook {background: #3b5998;} </style> </b:if>
<b:if cond='data:blog.pageType == "error_page"'> <div id='error404'> <div id='error-text'> <span><font color='blue'>Your-Blogger-Tilte</font></span> <p><form action='http://myblogger.blogspot.com/search/' id='cse-search-box'> <div> <input id='cx' name='cx' type='hidden' value='partner-pub-'/> <input id='cof' name='cof' type='hidden' value='FORID:10'/> <input id='ie' name='ie' type='hidden' value='UTF-8'/> <input class='md_search_txt1' id='q' name='q' size='55' type='text'/> <input class='md_search_btn1' id='sa' name='sa' type='submit' value='Search Site'/> </div> </form></p> <p class='summary_404'><font color='black'>We are working hard to fix all the missing resources at Your-blogger-name. If you need anything urgent, please send us an email at [email protected].</font></p> <p align='center' style='font-family:arial;font-variant: small-caps'> <a class='fa fa-facebook' href='http://www.facebook.com/username/' target='_blank'/> <a class='fa fa-twitter' href='http://www.twitter.com/username' target='_blank'/> <a class='fa fa-google' href='https://plus.google.com/username/posts' target='_blank'/></p> <p><a class='back' href='/'><i class='fa fa-home'/> HOME</a></p> </div> </div> </b:if>
Customization
Replace the blue text/url with your own text and one.


Speak Your Mind