An Author Bio Box is clearly defined as the writer of any written article. Author bio-box is the identity of a blog writer. In general, a blogger author is a person who writes the articles. If you are looking for a fully responsive author bio box for your blog, Simple Author Box could be the one for you. This lightweight piece of code will add an attractive author box at the end of your every blog posts. The author box displays the author name, description, and links to various social media accounts.
Check out: How to Add Dark Author Bio Box Widget to Blogger Blogs
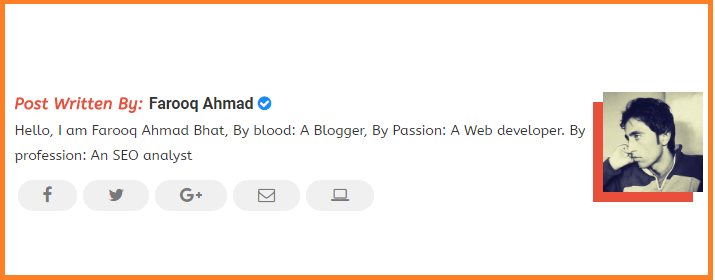
Adding an author box to your blog posts makes sure that your visitors can find more information about the author on the same page. Contrary to popular belief, adding author box after the post is very simple. If you wish to give your blog a professional look, then here I will show you excellent trick which let you add author Bio box within no time.
Pay Attention: Prism Syntax Highlighter Shortcode For BlogSpot Blogs
Adding Author Bio Box to Blogger Template
- Go to your blogger Dashboard > Template > Edit HTML
- Click anywhere inside the template editor
- Press Ctrl + F and search for ]]></b:skin>
- Now just below the ]]></b:skin> add the following CSS code
- Final step, find the and </article> past the given snippets right below it
.authorboxwrap{background: #fff; border-bottom: 1px solid #eee; padding: 15px 0;overflow: hidden;} .avatar-container {float:right;-webkit-box-shadow: -10px 10px 0px 0px rgb(232, 80, 60); -moz-box-shadow: -10px 10px 0px 0px rgb(232, 80, 60); box-shadow: -10px 10px 0px 0 rgb(232, 80, 60);} .avatar-container img{width:100px;height:auto;max-width:100%!important} .author_description_container h4{font-weight:600;font-size:16px;display:block;margin:0;margin-bottom:2px} .author_description_container h4 a{color:#333} .author_description_container h4 a:hover{color:#404040} .author_description_container p{margin:0;color:#333;font-size:14px;margin-bottom:8px;line-height:25px;font-weight:400;} .social-links li { list-style:none !important; float: left;} .social-links a {border-bottom: none;} .social-links a:after, .social-links a:before{ content: none!important; } .social-links i { background: #f0f0f0; color: #787878; font-size: 17px; text-align: center; display: inline-block; padding: 7px 25px; margin: 0px 3px;border-radius:60px; } .author-box .avatar{margin-left: 2.4rem; float: right !important; border: 2px solid #F0F0F0; padding: 2px;}
<b:if cond='data:blog.pageType == "item"'>
<div class='authorboxwrap'>
<div class='authorboxfull'>
<div class='avatar-container'>
<a href=''>
<img class='author_avatar' expr:alt='data:post.author' expr:src='data:post.authorPhoto.url' height='110' width='110'/>
</a>
</div>
<div class='author_description_container'>
<h4><span>post written by: </span><a href='#' rel='author'><data:post.author/></a> <i class='fa fa-check-circle' style='color:rgb(17, 143, 249);font-size:16px;' title='Verified Author'/> </h4>
<p>
Write about yourself here........
</p>
</div>
</div>
<ul class='social-links'>
<li class='first'><a class='external external-link' href='#' rel='nofollow' target='_blank'><i class='fa fa-facebook'/></a></li>
<li><a class='external external-link' href='#' rel='nofollow' target='_blank'><i class='fa fa-twitter'/></a></li>
<li><a class='external external-link' href='#' rel='nofollow' target='_blank'><i class='fa fa-google-plus'/></a></li>
<li><a class='email-link' href='mailto:[email protected]'><i class='fa fa-envelope-o'/></a></li>
<li class='last'><a href='/'><i class='fa fa-laptop'/> </a></li>
</ul>
</div>
</b:if>
Customization: Replace the text with your username/text/URL


Speak Your Mind